Introduction to ComfyUI
Date: 2024-11-17 Categories: AI-generated imagery
Currently, there are two main tools for creating with Stable Diffusion: WebUI and ComfyUI. The later-emerging ComfyUI has quickly gained global popularity due to its high customizability and reproducibility.
This article will provide a detailed introduction to what ComfyUI is, why it’s good, and how to use it.
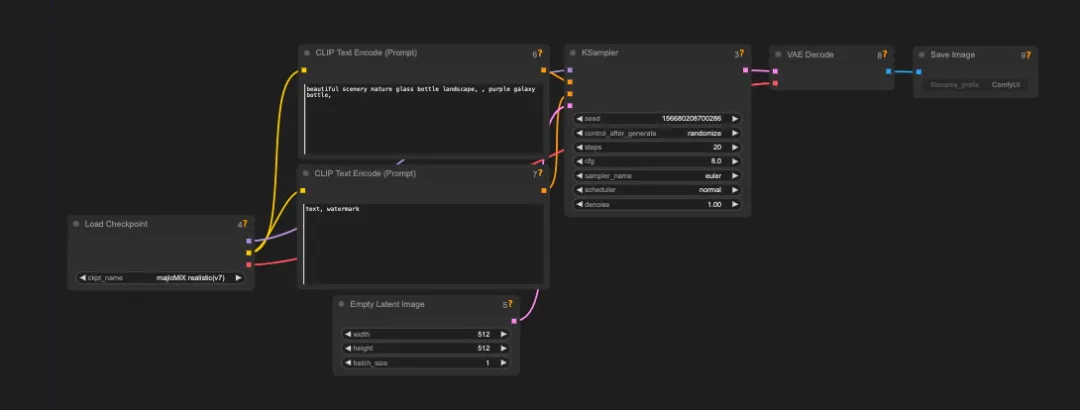
ComfyUI is a node-based graphical user interface (GUI) designed specifically for Stable Diffusion. Simply put, it breaks down the entire image generation process into multiple independent nodes, each with its own distinct function, such as loading models, providing text prompts, generating images, and more. These modules are connected through input and output lines to form a complete workflow.

Throughout the process, users can flexibly adjust and configure different functional nodes, which means the entire model becomes more versatile and the control more precise.
As the two most popular creative tools today, WebUI is ready to use out of the box with comprehensive basic features and extensive community support through numerous plugins. It’s relatively easy for beginners to get started. However, its customizability is somewhat limited, making it harder to replicate and share complex workflows. Additionally, using APIs with WebUI can be somewhat challenging.
Although ComfyUI was released later, it offers strong customizability, allowing creators to experiment with various innovative ideas. By utilizing workflows, it can achieve a higher level of automation, making creative methods easier to replicate and share. Its rapid growth and popularity have been remarkable. Compared to WebUI, there are many significant differences between the two.
1. ComfyUI is more GPU-friendly.
Even with a GPU less than 3GB, ComfyUI can still function normally. It consumes less VRAM and can generate larger images with the same VRAM compared to other tools. Additionally, ComfyUI runs smoothly on Mac computers (recommended for M1 and above), offering Mac users the opportunity to generate SD images, even though it doesn't match the performance of Windows. In contrast, WebUI has nearly abandoned users with less than 12GB of VRAM, with inefficient VRAM usage, and doesn't support Mac users well.
2. ComfyUI significantly improves running efficiency.
The designer ran a batch of 20 images using ComfyUI and Automatic1111 WebUI to check the total time for each image. These images were based on the Stable Diffusion 1.5 model with a resolution of 512x768. For reference, an RTX 3060 (12GB VRAM) was used. The final results are as follows:

WebUI takes more than twice the time compared to ComfyUI, which is a significant gap. This time difference becomes even more apparent when you use SD to generate video and render each frame.
3. ComfyUI allows real-time preview.
Users can instantly see the generated results. This is thanks to the high flexibility of node connections, allowing you to insert image generation function nodes at any point. This way, you can preview the image generation effect in real time at the desired position.
4. ComfyUI allows complete workflow reuse.
ComfyUI's workflows can be saved as separate JSON files. You can directly use the ideal workflow from a downloaded file or make any modifications and additions to it. It's important to note that the original image files generated by ComfyUI also retain the workflow data. This means that as long as you download the original image file uploaded by a designer on social media and drag it into ComfyUI, the workflow will be instantly replicated.
5. Common Models with WebUI
WebUI and ComfyUI essentially both use the Stable Diffusion large model to generate images, but the way they are used differs. Therefore, if you are an experienced WebUI user, you can directly use the models from WebUI with ComfyUI, and the process is very simple.
Here are some essential tips for new designers that you'll definitely find useful:
1. ComfyUI Manager
ComfyUI is entirely built with nodes, so downloading different nodes is one of the first challenges you'll encounter. The ComfyUI Manager, as a node, can be seen as a plugin. It allows you to download almost all the nodes you might need and provides functions like updating and managing custom nodes. Once you have it installed, you won't need to install nodes through GitHub anymore.
After installing ComfyUI Manager, restart ComfyUI. On the right side, you will find a "manager" option. Click on it to enter the plugin interface.

Two of the most commonly used features are searching for and installing nodes, as well as one-click installation of all missing nodes in a workflow.
ComfyUI Manager:github.com/ltdrdata/ComfyUI-Manager
2. Importing WebUI Models into ComfyUI
Designers who have used WebUI should already have downloaded many models that they find convenient to use. These models are also compatible with ComfyUI, so all we need to do is share these models to use them in ComfyUI.
The specific process is as follows:
- In the ComfyUI directory, there is a file named `extra_model_paths.yaml.example`. Rename it to `extra_model_paths.yaml`.
- Open the file and find the line `base_path:path/to/stable-diffusion-webui/`. Replace the path with the path to your WebUI, for example: `base_path:D/StableDiffusion/stable-diffusion-webui/`.
- Finally, restart ComfyUI, and you will be able to find the model under the `Ckpt_name` in the `Load Checkpoint` section.


 京公网安备11011502038441号


